Saturday, December 8, 2012

Up in Coming December Design Releases for Pop Princess!

My lovely readers, I'm sorry for continually disappointing you with my lack of writing. I sometimes wish I had a clone to do the mundane things in life, like working, while I get to frolic about sewing, designing, and writing. Work is keeping me exceptionally busy, busier than I thought it would and as such I have not been able to do much in the ways of designing to be able to show new things for you. So for now, the production will be a bit slower than usual, especially since my carpal tunnel is acting up because of work. <3

On the flip side though, I suppose that allows me a longer time to conceptualize the designs and continue to refine my process by going a bit slower. : ) There are two new designs which I'm delighted to share with you, that will be released this upcoming month of December--but first,
they are making a trip to Disney World where they will be on location for a photo shoot with our very first Pop Princess spokes model! (I'm looking forward to introducing you to her, she is adorable! For now, I am keeping it a secret to surprise you!)

I've also decided to budget, and purchase a nice digital SLR camera over the winter month as I think it is time for me to be able to show off the details and beauty that the garments I make deserve. I feel I am short changing not only you, but myself as well by not being able to capture them professionally.

For now, a few sneak peeks... <3

Red Velvet Bunny Tea Party OP:


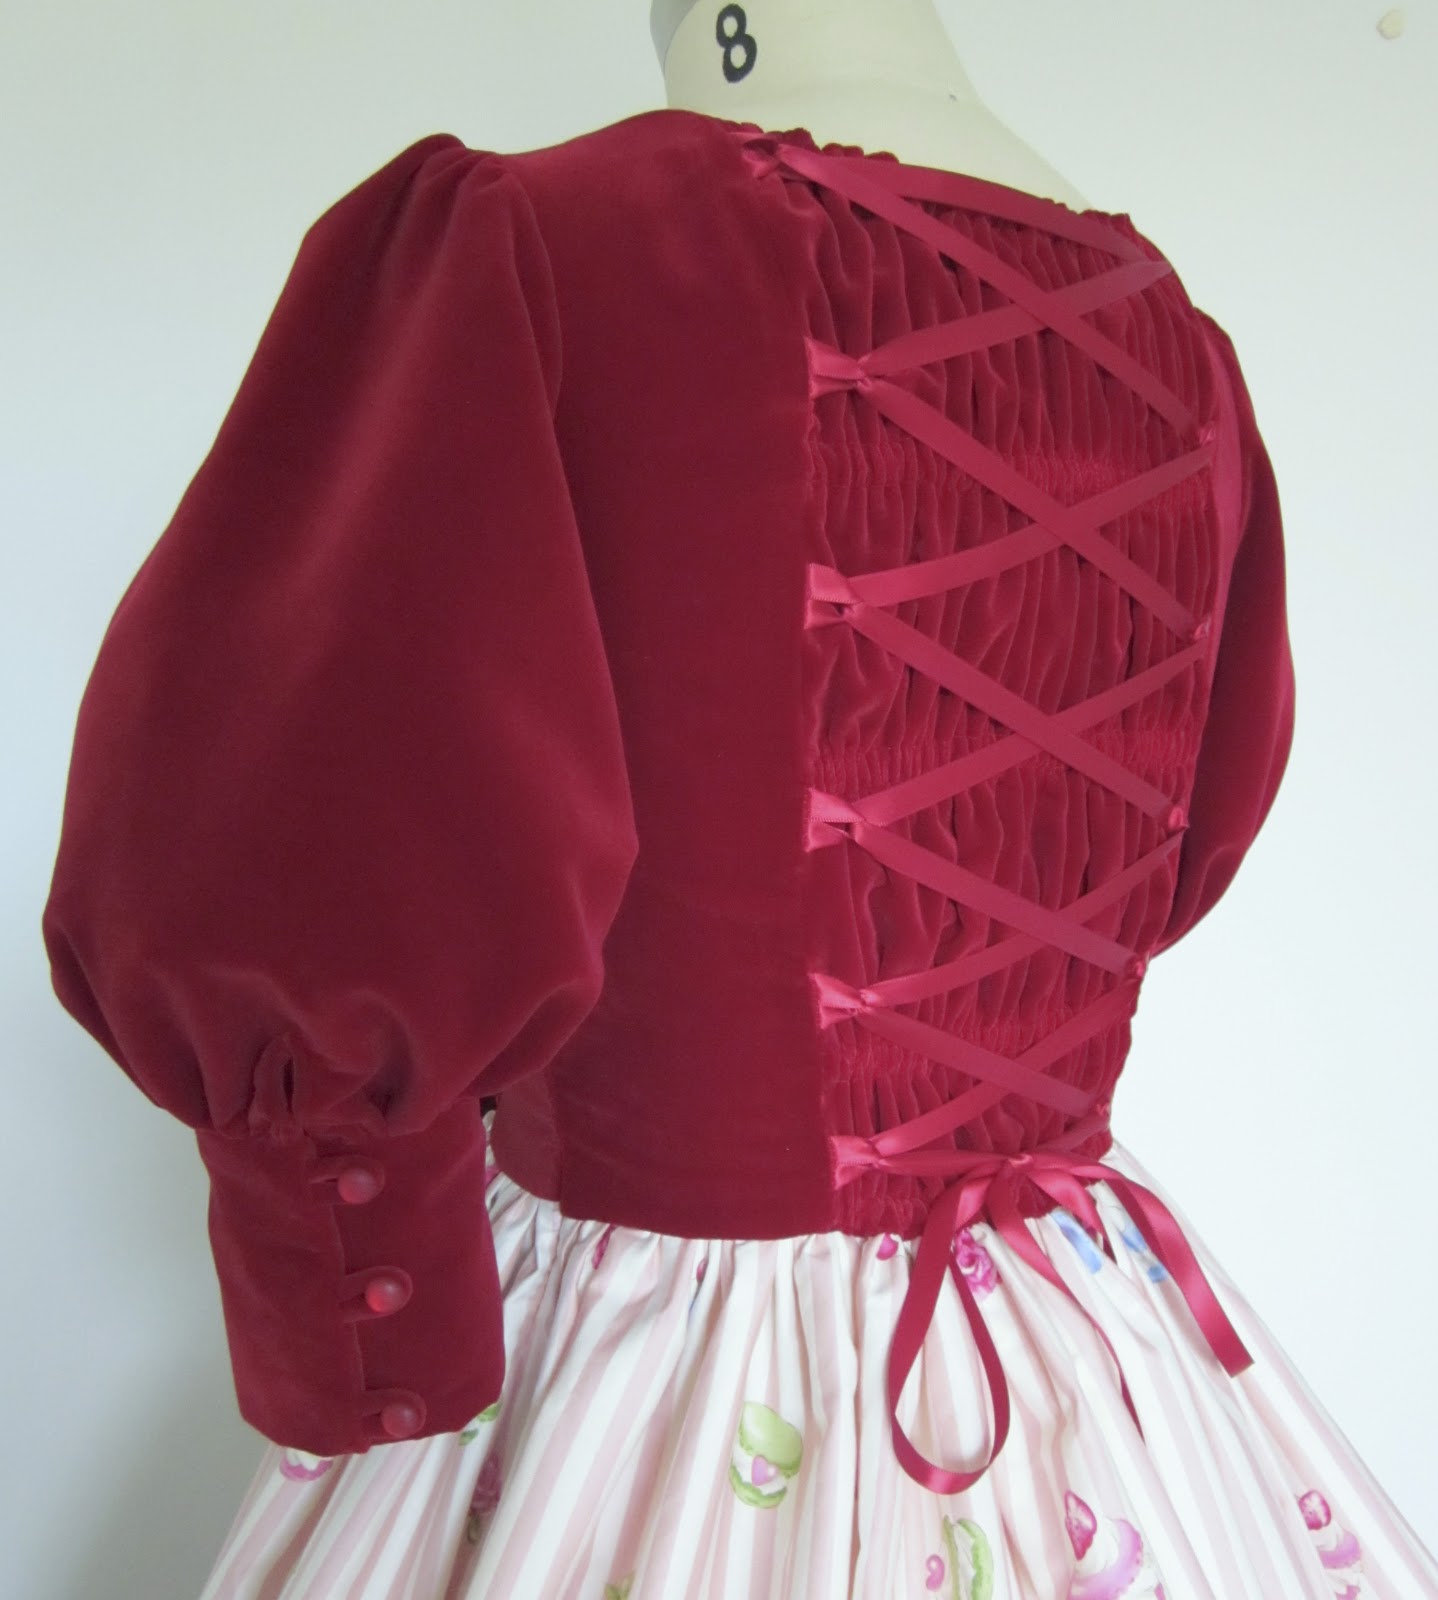
When I first got the red bunny fabric, I wasn't certain what I was going to do with it until the weather started to turn colder and I thought to myself that girls would want to look very pretty but still be able to keep warm. I was between a lovely silk and a deep, cushy top of the line velvet. As you can see, I went with the velvet and it is GORGEOUS, just gorgeous. My camera just can't capture how lush the fabric is in person. I adore it so much, I've decided to do another but in black!

I went ahead with a lovely mutton style, full sleeve with a bias bound keyhole and a 3/4 length, that allows the buttoned up cuff to rest just above the elbow which accentuates the fullness. It took me some time to dye the lace by hand, about 3 batches, to get it the right kind of shade that would accent the red in the bunny fabric, but also work nicely with the richness of the velvet.


I wanted to keep the one piece dress simple, but elegant by using a minimal amount of design features: red pearl faced buttons, scallop lace, and a lovely double faced satin ribbon on the back. You know what else makes this dress awesome? : o There's (literally) 144 inches of skirt gathered into that waist line... I sort of want to have a contest to see how many petticoats it actually fits..... : >
When I was finished, I topped it off with a lovely and beautiful velvet waist bow that is removable. I even made a cute matching head bow to go with it! (Had I had more velvet I would have sooo made a gorgeous red velvet bonnet with roses! *o*)

Alice in Wonderland Frame JSK:


This next one, I am also EXTREMELY excited for!!! This is one of the most gorgeous prints I have seen in a long time, and am honestly grateful I got my hands on even a little bit of yardage considering how rare it is and super super expensive.*o*

 This extremely decadent print, featuring Alice in Wonderland, is set off by its pale pink background, and was carefully illustrated with the up most care for even the tiniest details. Vines, roses, and ribbons criss cross down it's front until your eyes reach the gilded frames setting off Alice, The White Rabbit, and a set of tea cups, and is finished by a scalloped set of ribbons and printed lace.
I wanted this jsk to have a more classic feel than my other work, but was originally inspired by antique pinafores worn by little girls in the Victorian era which featured the big ruffles along the shoulder. After importing some rose and scallop trim, I went through great lengths to painstakingly hand dye the yardage needed to match the dress. It took about 4 dye baths to get the color I was satisfied with using a bit of bordeaux, scarlet, and true red from my chemical powder dyes I acquired when I was attending CCAD. (Mrs. Grebennik would be proud!) The rose and scallop trim are really gorgeous, and I think compliment the design well!
As you can see, the bodice features a bit of shirring at the bust line with tiny pin tuck gathers, as well as a pinch of gathering at center front where the bow is placed. The bodice is sewn in three separate sections to allow for the scallop chemical lace trim and roses to be inserted properly, and also gives
it a smoother, more flattering fit. I also realized these sections would need a touch of interfacing to stiffen them, especially with the pull of the lace up ribbon.
Then lastly, I decided to go for a removable beaded bow at center front of the bodice. I wanted something that wouldn't overpower the overall design, but just add a hint of something cute as well to compliment the neckline.

This pattern took quite a lot of work, and caused me a bit of frustration in order to get the corset like panels in the right place, lining up the print as best I could, and then that darn sweetheart neckline decided to give me a bit of trouble as well! And then of course all the top stitching looks lovely, but took some time to get right. But, all's well that ends well. Initially, I was going to go with a 5/8" wine colored ribbon, but in the end went with the 1/4" because I felt it worked better with the criss cross design of the roses.
Now of course, the main event which is really what makes this dress so beautiful and stunning... the print itself. Here are some close up shots! <3
Ah, I feel quite satisfied with this piece, even if it did give me some trouble and frustration! Sadly, this yardage is so rare that this is the only one of its kind right now. However, I hope to find some again through my sources and save up for since I know it will be at least $100+ dollars if I do find it!

Both of these prints will be headed to Disney World this next for an exclusive photo shoot with our very first Pop Princess Spokes Model! : 3 I am very excited to introduce you to her, as she is a very sweet girl, and lovely! Can't wait to share those photos as well, how exciting!

Look for these dresses to be up at Pop Princess after the weekend of the 21st, perhaps even sooner, depending upon how the shoot goes! So they will be up no later than the week before Christmas!

So what do you think, my loves? : 3 Would you like to see more designs like this? With velvet and trims?

xoxo
Annika

*All designs/illustrations are copyrighted and belong to Pop Princess/Annika Simmons.*
Please do not redistribute photos without permission, or proper credits! <3

Wednesday, December 5, 2012

The Super Secret Christmas Sale for Pop Princess! : 0

Oh my dear lovelies, I am so sorryyyy! I know I have kept you waiting in suspense about the coupon code that I promised you to be able to use, and hear I am just draggggging it out. (Really though, I have just been bombarded with work!!! No seriously, and then my tire blew out and my headlight blew out and AHHH! >.< Help!)

And here I am waving a shiny pink coupon at you in the distance skipping away through a field of wild flowers, candy colored frilly skirt blowing in the wind, with tiny hearts dancing around my head just out of reach......

Dear Annika,

Please stop prattling on, and give us the coupon!!! (*#&$(*&@&(*#!!! Seriously, hush. Your silly day dream descriptions
are silly. And we'll we really just want the coupon. Okay, well, I guess we sort of like you too.

Love,
Your Readers

Dear Readers, 

I am sorry, hushing now, coupon and info below. D : I love you! : O 
And hope all of you have a wonderful Christmas or special holiday! <3

Love,
Annika
Illustration belongs to, and is copyrighted by: Annika Simmons/Pop Princess


This coupon code, is especially for you, my loves! <3 After all, you are my readers and you deserve something special for the holiday! So shhh, keep it a secret amongst yourselves haha. :3 I'm not advertising it anywhere else, just here, just for you! <3

It only lasts until CHRISTMAS day so get to shoppin, pretty girls! ^-^ Just enter the code into the shopping cart on my Etsy shop and you are good to gooooooo. (No spaces, ALL caps!)

xoxoxox
Annika

Friday, November 30, 2012

Lolita Blog Carnival: DIY Gift Ideas for the Holiday!

Hello, lovely readers! I am sorry for my absence! I have recently started a new job, and it has been keeping me very, very busy so I have not had much time in the way of crafting/designing/blogging.

I didn't want to leave you hanging two weeks in a row though---how rude of me!

(Or has it been three weeks...oh my.)

This week's article prompt was do it yourself gifts, which was just in time for the Christmas season! Which I thought was lovely, since I keep a little folder on my computer for things/tutorials I want to make or try out!

 Week 10: DIY Gifts/Tutorials 

♡ A Light Up Stuffed Animal Fox Lamp! 
Credits: Matsutake Blog

A Book Purse, how cute!
Credit: Innocent World

Credit: MNN


Give Em Plush!!
Creidt: LollyChops.com

Credit: Bora @ Spoonflower

Frilly DIYLolita!
Credits: Quaintrelle Life/ Vivien Hoffpauir of Vivcore (I actually remember reading this article when it first came out in Shoujo Beat Magazine many, many years back. I've always wanted to try it!)

Credits: Quaintrelle Life/ Vivien Hoffpauir of Vivcore

A Pop Princess Tutorial!

♡ So now it's your turn, readers! Inspire me this holiday season and show me your favorite tutorials for a DIY Christmas! ^-^ 

Need More Ideas? Read On from others of Lolita Blog Carnival! ♥

Monday, November 19, 2012

Coloring Clay for Sugary Sweet Desserts: A Tutorial for Miuko!

Last month, darling reader Miuko, commented on the post Playing in the Bakery and wanted to know how it was that I colored my clay with pastel shavings! I really must apologize for taking soooo long to do and write up this tutorial! : o

Things have been very hectic this month, as I've been trying to get some seasonal/part time work at local places here in my hometown, which has been very stressful and taking up a lot of my time. (So if I disappear for a good part of the holiday month, this is me saying sorry ahead of time! You know, have to pay those student loans and all. >.<)

[Update: Got a part time job! Hooray! <3 Extra busy!]

On to the tutorial, let's see how messy I can make my camera! ^o^

Things You'll Need: 
-Clay: White and/or Ecru
-Pastels
-X-acto knife
-Paint Brush
-Old/Unused Tooth Brush
-Colored Glue Sticks
-Glue Gun
-Wax Paper/Flat Surface like a Mat Board

✩ Before We Begin... Prep Work!:

As you can see, we have all of the things we need (well most of them) laid out on our work space! I am going to show you how to color your clay with pastel shavings. This is not necessarily a tried and true way, everyone has a different way! I just like this one because it gives my hands a work out. (Plus, have you ever seen me use pastels for an art medium? Trust me, this is more useful. Haha.)

Look! I even have a kitty and a computer!
1. Take a piece of your white clay, and a piece of your ecru colored clay, and start mixing them together, kneading them like you would a pizza dough! Smash it up with your hands, squish it back and forth, until the two colors are blended completely. This gives you the base color needed for your cookie.
Oh, inadvertent product placement...
(In the "Bakery" post I only had white at the time, so you cannot imagine how long it took to get the color just right that way for a cookie!!! Plus, if you only use white clay, you end up having to color it separately to get your base shade with the pastels and the clay dries out, and you have to re-wet it, and continue to color---what a mess!)

Once you've rolled into a little ball, all nice and cute, you're going to flatten it like a pancake! You can use anything cylindrical, like a marker, like a tiny rolling pin and smoosh it. Remember not to flatten it too much---if it gets too thin your cookie will look silly! 

1.1. Now, I just cut my shape out with my knife, since it's what I had handy. So I made this little heart! When you cut with a knife (or even the cookie cutters) the edges/shape of your clay is going to look really, really rough and uneven. So with my fingertips, I go ahead and smooth out all that roughness till it looks nice. And since we're texturing it anyway it doesn't need to be perfect.


If you have extra clay after cutting out your cookie, roll it up nice and tight and stick it in a plastic zip lock with your other clay, this will keep it nice and fresh to use next time. 

2. With your X-acto knife (or since I couldn't find mine... the box cutter. Hm.) you're going to shave off parts of your pastels and keep them in little piles. You can see I've used a light brown, a darker brown, a mixture of the two, and a touch of flesh tone pink. If you run out, don't worry, you can always shave off more!

3. Using the paint brush, I'm going to start "coloring" my cookie almost like I would do when I paint (which I also don't do well >o<) or think about how you might shade in an illustration. I'm going to use the lighter shades for the center of the cookie, dabbing on layer by layer, creating more shades and tones as I reach its corners. This gives the cookie more depth by adding the darker colors at the edges. I just keep blending and dabbing with my brush till I'm happy how it looks. I include the pinky flesh tone because it adds just a hint of warmth. Make sure you "paint" the sides of your cookie too, otherwise it's going to look very, very strange. 


4. Doesn't look like much does it? When I first tried this, I said to myself, "YIKES! This looks horrible! I'm no good at this at all!! Eeeeee!" and ran to rock back and forth in a corner saddened deeply by my lack of faux cookie baking talent. Just kidding! ^-^ But I really was horrified... D :

4.1.  Next, we are going to take our toothbrush and have a bit of fun! This is going to create that "just baked, cookie crumble" texture that happens in real, delicious cookies. (Is anyone else getting hungry?) Lightly, tap the tooth brush against the edges of your cookie, and across it, and around it, harder and softer in different areas for a more pronounced texture. This will round out your cookie, but also make it look more realistic AND blend your pastels together even further. Don't forget about texturing the sides too!


If you're not satisfied with the color, remember you can always lighten it with a bit of white if it's gotten too dark, or add more color and re-texturize the cookie with tooth brush!

5. Uh-huh, looks better, right? Right? Now, you're probably thinking.... uh, Annika... there is clearly a back side to this cookie and it looks terrible? Am I doomed? Should I start over? No, silly goose. Honestly, don't worry about the back. You can try to color it if you really want to but then you'll just end up smooshing all that hard work you put in to the front.


6. Go bake that cookie on tin foil on top of a cookie sheet according to your clay's instruction. Let it cool down andddd time for that sauce.


Once your cookie has cooled, it's time to apply a top coat. With the tooth brush and the baking, I've found that the pastel stays really well and doesn't come off, but to be safe I always use a thin layer of clear nail polish. (If you want to apply "sugar" now would be the time while the nail polish is tacky and drying.)
7. I actually read a fantastic article on how to make your own sauce here out of pastel shavings and epoxy, which I really want to try one day, given I have the money to buy the epoxy and of course appropriate ventilation. You can buy the deco sauces that special decoden stores carry in the little tubes, but to be honest I prefer the colored glue stick kind! (Which I buy from Kawaii Supply, but can also be found on Etsy!)

And Miuko, you thought the sauces would be tough, didn't you? :3 Sorry, I tricked you! <3 If I ever try the Epoxy one, I'll let you know! I hope this was helpful, and you liked the tutorial.

Here we are, all done! I made this one into a little ring and dripped the sauce as an experiment... this is a lot harder than I thought it would be hmmmmm. : o Silly me!

I still need to trim up the strings!

Here's how the final ones turned out from the "Bakery" feature too:

Mmmm, cookie jewelry set!
xo
Annika


In other news: POP PRINCESS GIVEAWAY/Secret Coupon Code/Sale!

I am getting so excited to see so many people following my blog! :waves: Hi, new readers! And also sooo happy to see so many fans/hearts/views on my Etsy store, especially given that it's only a year old. There are so many numbers almost starting with 5, that I think we're going to celebrate with a future giveaway and coupon code, just for you, dear readers!

We have on Etsy...
452 admirers/hearts
473 shop admirers
44 sales
39, 415 views for ALL time!!!

AND as of today on the blog...
4995 page views (Wow! Does this mean you like me?)
34 followers! <3


If we can get one, or all of the following: 48 more admirers/hearts, 27 more shop admirers, 5 more blog page views, and/or 16 more blog readers before December, then I am going to list up a special coupon code for the Pop Princess shop for the month of December to ensure you get all your Christmas goodies, but just for you readers!! <3

And as a special thank you, I want to do a special Pop Princess giveaway after the holidays! So start scheming, and writing those wish lists to Santa. ; ) And I'll think about what special goodies I can make for the give away!

Friday, November 2, 2012

Lolita Blog Carnival: My Cute Loli Playlist!

Oh Pusheen, I do love you so.


 Week 6: Your Lolita Playlist

This week's topic was refreshingly open ended, and not too complicated, which is a nice change of pace given the hectic weather related incidents we've all been having because of the hurricane! Almost all of Northern Ohio along the lake coast has no power/heat/anything because of the power outages caused by the plant going kaboom on Tuesday night. Hopefully I get this published in the few minutes I do have internet! We had no heat/hot water/electricity for two days and it was absolutely miserable. We couldn't take it anymore, so we drove an hour west and luckily there is some power here. I can't imagine what it's like for the coast line.

Before I continue, to everyone on the east coast who is without power because of the hurricane, my thoughts and heart are with you. I keep watching the news/photos roll through of the devastation Sandy caused, and I can only hope that you are safe and warm. Please keep your chins up, and let's hope everything gets fixed soon!

Enjoy my Lolita playlist of songs that either remind me of frilly cuteness or things I listen to while dressing up in frilly-ness!

Kyary Kyary Pamyu (All of her songs are cute!)
Perfume

Hatsune Miku/ Vocaloid

These are just a few things I like! So what music/songs do you like to listen to while dressing up in your ribbons and pearls? Or what music reminds you of Lolita? ^-^ 

Find out what other lolis jam to from the Lolita Blog Carnival! ♥

Related Posts Plugin for WordPress, Blogger...